
UPDATE: There’s an updated version of this post now available for scripters.
I’ve posted several times about how I personally build my SolarWinds Orion Servers. For this post, I’ll just discuss how I setup a Main Polling Engine on a Windows 2012 R2 Server.
Please note that some of these configuration changes are very advanced and you should only do them if you are comfortable and have a good understanding of what these changes actually do.
I’d only recommend these settings on a new server build. If you do these changes on an existing server, you can easily brick the installation.
The various admin guides for the SolarWinds products give very good sizing information for the processors (count and speed), memory and disk space. However, I’ve found that the true bottleneck in the recent years is disk speed.
With that in mind, I use separate disks and put them in separate RAID groups based on the need. Here’s how I provision my disks:
| Disk | Description | Size | Read/Write Ratio | I/O Type |
|---|---|---|---|---|
| C: | Windows OS | 40 GB | 80/20 | Random |
| D: | Page File | (RAM + 257MB ) + 20% GB | 50/50 | Random |
| E: | Programs | 20 GB | 75/25 | Random |
| F: | Web | 10 GB | 90/10 | Random |
| G: | Logs | 50 GB | 25/75 | Sequential Write |
So I have five different disk ratio and I/O Pairings.
If you elect to go with my layout, that means you have 5 disks that need to be setup. Once you have those disks setup and provisioned to your server, you are ready to begin.
Formatting the Disks
I’m using NTFS with 64K Allocation Unit Sizes for all drives and I’m letting the Windows Installer configure the C:\ Drive. I’ve seen no difference in using NTFS vs ReFS, so I’m still using the same.
I’m also disabling the native indexing on the disks because that’s just wasted IOPS that I could use. Right-click on the drive and select Properties, then just uncheck this box.

I do this for every drive except the C: drive.
Windows Features
The SolarWinds Orion installer will install missing Windows Features, but I prefer to do them in advance. This gives me a few options, but most notably, the ability to change IIS settings before the installation is run.
I’ve included a handy PowerShell script below to install them all for you. Just be sure to run PowerShell as an Administrator.
$Features = Get-WindowsFeature -Name FileAndStorage-Services, File-Services, FS-FileServer, Storage-Services, Web-Server, Web-WebServer, Web-Common-Http, Web-Default-Doc, Web-Dir-Browsing, Web-Http-Errors, Web-Static-Content, Web-Health, Web-Http-Logging, Web-Log-Libraries, Web-Request-Monitor, Web-Performance, Web-Stat-Compression, Web-Dyn-Compression, Web-Security, Web-Filtering, Web-Windows-Auth, Web-App-Dev, Web-Net-Ext, Web-Net-Ext45, Web-Asp-Net, Web-Asp-Net45, Web-ISAPI-Ext, Web-ISAPI-Filter, Web-Mgmt-Tools, Web-Mgmt-Console, Web-Mgmt-Compat, Web-Metabase, NET-Framework-Features, NET-Framework-Core, NET-Framework-45-Features, NET-Framework-45-Core, NET-Framework-45-ASPNET, NET-WCF-Services45, NET-WCF-HTTP-Activation45, NET-WCF-MSMQ-Activation45, NET-WCF-Pipe-Activation45, NET-WCF-TCP-Activation45, NET-WCF-TCP-PortSharing45, MSMQ, MSMQ-Services, MSMQ-Server, FS-SMB1, User-Interfaces-Infra, Server-Gui-Mgmt-Infra, Server-Gui-Shell, PowerShellRoot, PowerShell, PowerShell-V2, PowerShell-ISE, WAS, WAS-Process-Model, WAS-Config-APIs, WoW64-Support | Where-Object { -not $_.Installed }
$Features | Add-WindowsFeature
Reboot if requested by the PowerShell script output.
One more (optional) Windows Feature
I actually like to enable Data Deduplication (listed under File Share Services) and enable it for my log drive. This keeps the size consumed by the logs way, way down.
Non-SolarWinds Programs
I always install 7-Zip and Notepad++. I also install the ‘Save as Admin’, ‘Compare’, and ‘XML Tools’ plugins for Notepad++.
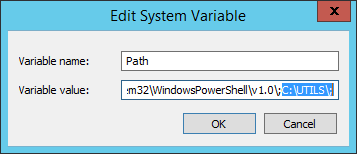
I also create a folder in the root of C: called “UTILS.” In there I copy the PSTools and the Unix Utils. Then I add that location to the system’s path variable. Recently, I’ve been adding PuTTY to this folder as well.

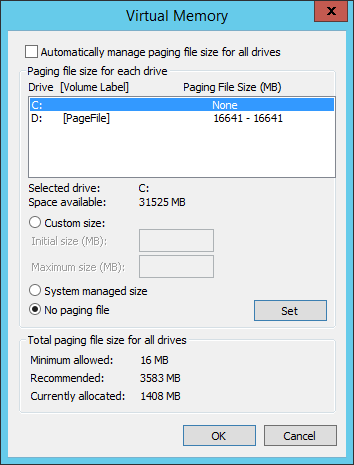
Configure Static Page File
Here, I remove the page file from the C:\ drive entirely and place it exclusively on the D:\ drive. This is found in System Properties \ Advanced System Properties \ Performance Settings \ Advanced.
Disk Performance in Task Manager
I’m so used to seeing the disk metrics in Task Manager (on my Windows Workstation) that I really missed them on Windows Server. You can get them back by launching Command Prompt as Admin and running:
diskperf -Y
Moving Web Temp Stuff
I move pretty much everything for the IIS infrastructure to a different drive. Since IIS is very particular about permissions, I use robocopy to copy the files over to the F: drive. Be sure to run this in command prompt (as an Administrator).
robocopy C:\inetpub F:\inetpub /E /R:3 /W:5
For some reason, when the IIS web folder gets copied to another drive it drops the Network Service’s permission. You can use this little PowerShell script to add it back (including the necessary inheritance).
$FolderPath = "F:\inetpub\temp"
$CurrentACL = Get-Acl -Path $FolderPath
$AccessRule = New-Object -TypeName System.Security.AccessControl.FileSystemAccessRule -ArgumentList "NT AUTHORITY\NETWORK SERVICE", "FullControl", ( "ContainerInherit", "ObjectInherit" ), "None", "Allow"
$CurrentACL.SetAccessRule($AccessRule)
$CurrentACL | Set-Acl -Path $FolderPath
# Verify - Should return one entry
Get-Acl -Path $FolderPath | Select-Object -ExpandProperty Access | Where-Object { $_.IdentityReference -eq "NT AUTHORITY\NETWORK SERVICE" }
Cleaning up the unnecessary Web Stuff
SolarWinds Orion installer will automatically create a new website for you, so you can remove the default one and the associated application pools. Again, I give a handy-dandy PowerShell to do this for you.
# Check for Admin Access (UAC)
$User = [Security.Principal.WindowsIdentity]::GetCurrent()
$Role = ( New-Object Security.Principal.WindowsPrincipal $user ).IsInRole( [Security.Principal.WindowsBuiltinRole]::Administrator )
if ( -not $Role )
{
    Write-Warning "To perform some operations you must run an elevated Windows PowerShell console."
}
else
{
    Get-WebSite -Name "Default Web Site" | Remove-WebSite -Confirm:$false -Verbose

    Remove-WebAppPool -Name ".NET v2.0" -Confirm:$false -Verbose
    Remove-WebAppPool -Name ".NET v2.0 Classic" -Confirm:$false -Verbose
    Remove-WebAppPool -Name ".NET v4.5" -Confirm:$false -Verbose
    Remove-WebAppPool -Name ".NET v4.5 Classic" -Confirm:$false -Verbose
    Remove-WebAppPool -Name "Classic .NET AppPool" -Confirm:$false -Verbose
    Remove-WebAppPool -Name "DefaultAppPool" -Confirm:$false -Verbose
}
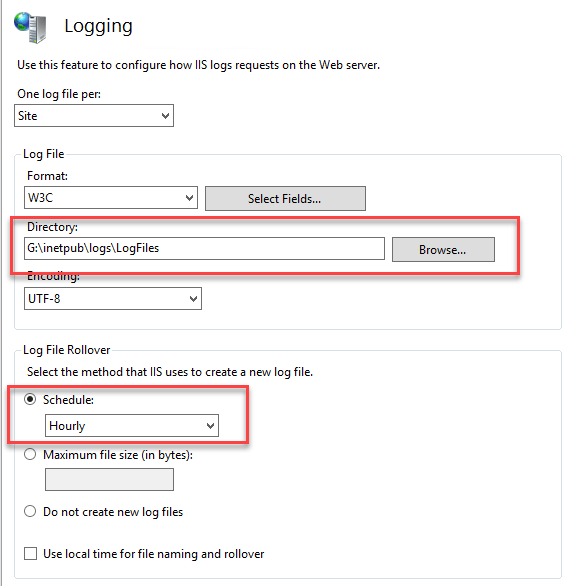
Tweaking IIS Settings
I do the basics here by changing the IIS log location to the Log Drive and I also change the logging level down to Hourly instead of Daily. I only do this so that the files are more reasonably sized.
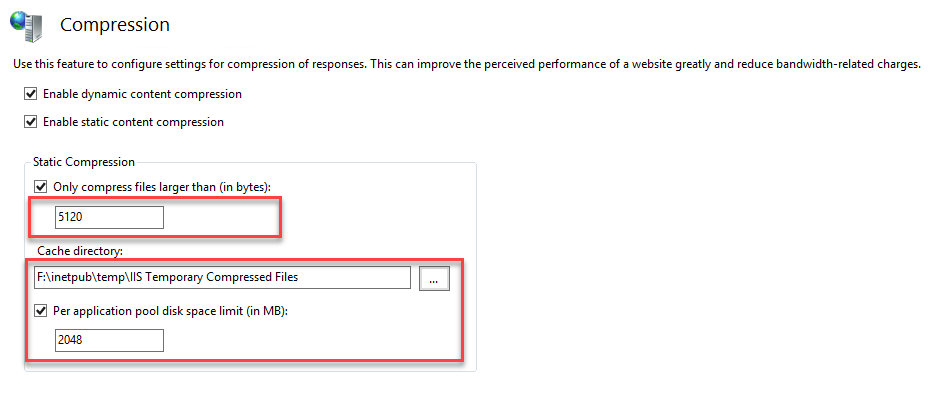
Next, I tweak the IIS Compression settings. I drop the minimum size and increase the size of the cache.
Lastly, I change the path for the IIS Temp Files used during compilation. This is something that I do manually via the .NET Framework config files. Because the SolarWinds Orion website runs in 32-bit mode, I just need to make changes to the 32-bit version of the config file. By default, it’s located at “C:\Windows\Microsoft.NET\Framework\v4.0.30319\Config\web.config”

Under the compilation section, you can add a directive called “tempDirectory” and point it to anywhere. I point this to the Web Drive.
I’m done with tweaking IIS and here I’d normally run IIS Reset, but since I’ll be rebooting because of Windows Updates, I can skip this.
We’re almost to the actual installation. Sit back and relax. You’ve done the tough part. The rest is simple – if it still takes a long time. (And it does for Windows 2012 R2 as of the writing of this).
Update Windows
I’ve written a small function to help you understand this next part.
10 Check for Windows Updates
20 if Windows Updates = 0 goto 50
30 Install Windows Updates
40 Goto 10
50 Exit
Create Symbolic Link from C to E/G
Like I said, I hate putting anything on the C: Drive except for the operating system, so I want to move any references to the SolarWinds Program Data (formerly “Application Data”) and the same for the folder in Common Files.
I do this by a little known tool included in recent versions of Windows called mklink.exe. This basically “fakes” out the system to use an alternate location – even on a different drive.
To do this, I create the target folders and then create the links.
G:\> mkdir G:\SolarWinds
G:\> mklink /D /J C:\ProgramData\SolarWinds G:\SolarWinds
Junction created for C:\ProgramData\SolarWinds <<===>> G:\SolarWinds
E:\> mkdir "E:\Program Files (x86)\Common Files\SolarWinds"
E:\> mklink /D /J "C:\Program Files (x86)\Common Files\SolarWinds" "E:\Program Files (x86)\Common Files\SolarWinds"
Junction created for C:\Program Files (x86)\Common Files\SolarWinds <<===>> E:\Program Files (x86)\Common Files\SolarWinds
Installing SolarWinds Orion
During the installation, be sure to redirect the default installation path to the E: Drive from your C: Drive – just swap the beginning of the installer path and you should be good to go.
After the installation is complete, the Configuration Wizard will begin. Be sure to change the location of the Web Site files.
Summary
That’s it. Pat yourself on the back – you’ve now installed a KMSigma-Approved SolarWinds Main Polling Engine. Now that you’ve installed your first product, go ahead and install the rest of the products on the server. Try out the whole suite. At work, I run all 11 of the Orion-based products. I challenge you to do the same.
Until next time… ramble on!